A Developer-Friendly Checklist for Zero-Downtime Deploys
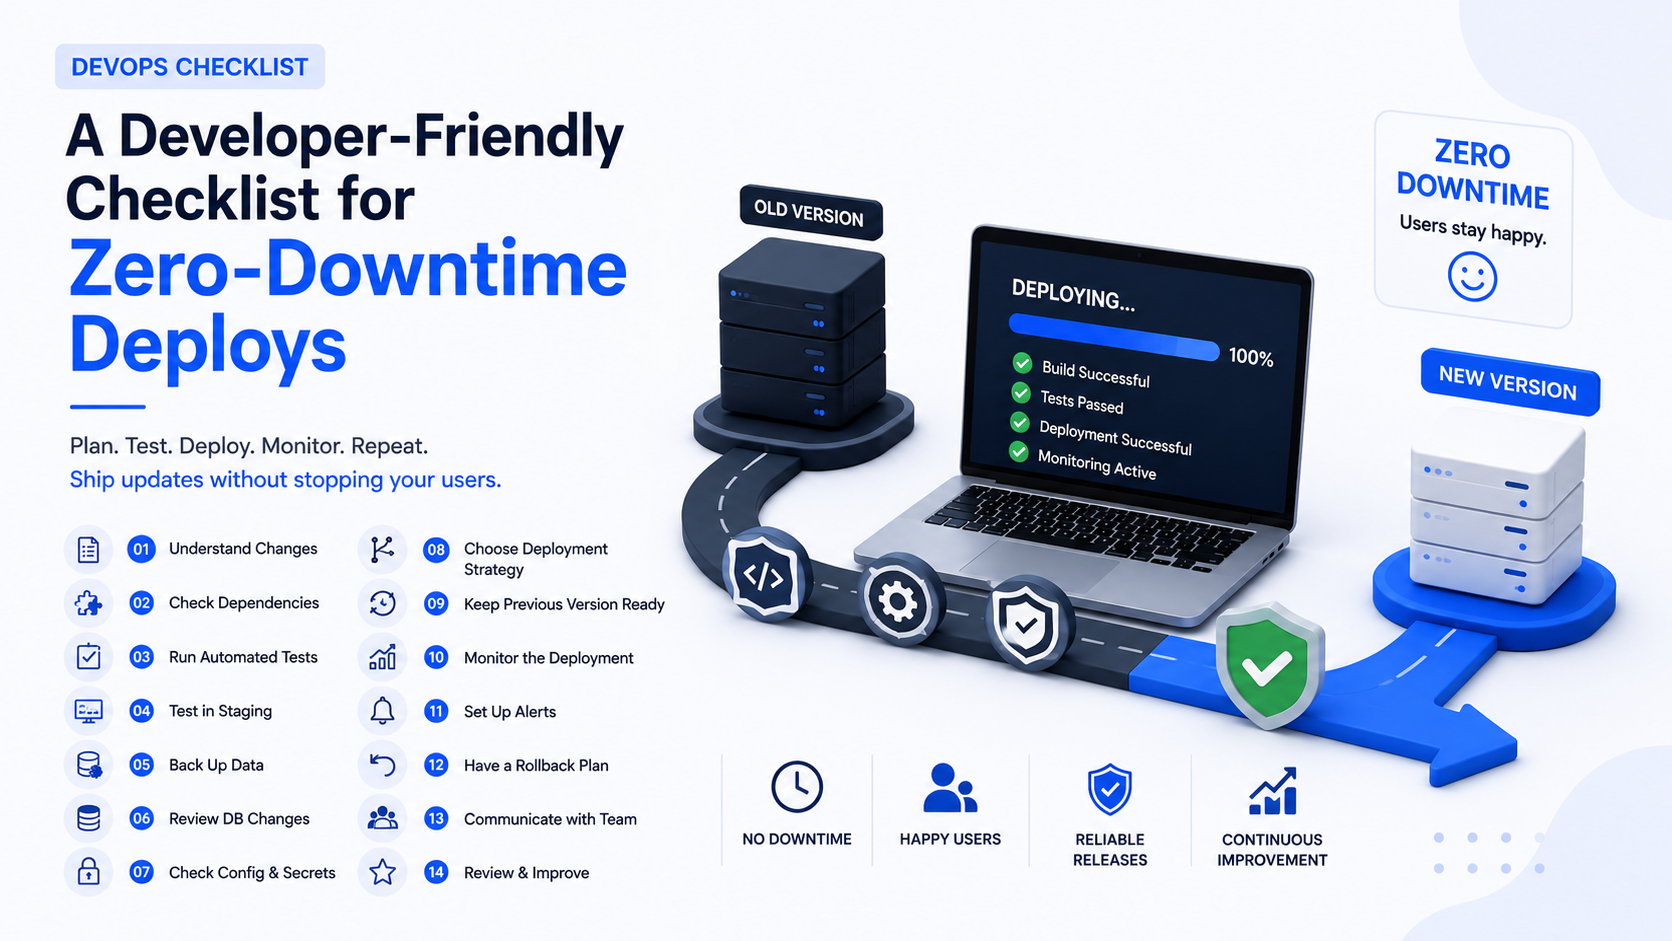
Follow this developer-friendly checklist for zero-downtime deployments. Learn how to prepare, test, back up, deploy, monitor, roll back, and keep your application running smoothly.
A Developer-Friendly Checklist for Zero-Downtime Deploys
Deploying a new version of an application should improve the product, not interrupt the people using it.
For developers and development teams, one of the biggest deployment goals is keeping an application available while new code is being released.
This is where zero-downtime deployment becomes important.
A zero-downtime deployment aims to release a new version without making the application unavailable to users.
At C2D (Concept to Deploy), we believe a reliable deployment starts with preparation, testing, monitoring, and a clear rollback plan.
If you're coming from our previous guide, you can read How to Maintain and Grow Your Business Website.
Let's go through a practical checklist for safer zero-downtime deployments.
What Is a Zero-Downtime Deployment?
A zero-downtime deployment is a release strategy designed to keep an application available while a new version is deployed.
Instead of completely stopping the application and replacing everything at once, different deployment strategies can gradually introduce the new version while keeping a working version available.
Common approaches include:
- Blue-green deployments
- Rolling deployments
- Canary deployments
- Feature flags
The best approach depends on your application architecture, infrastructure, traffic, and deployment requirements.
Step 1: Understand What You Are Deploying
Before starting a deployment, understand exactly what is changing.
Review:
- New features
- Bug fixes
- Code changes
- Database changes
- Configuration changes
- Third-party integrations
- Infrastructure changes
Knowing the impact of your changes helps you identify potential deployment risks before they reach production.
Don't deploy blindly. Understand the changes first.
Step 2: Check Your Dependencies
Applications often depend on external services, libraries, APIs, databases, and other components.
Before deployment, verify that important dependencies are compatible with the new version.
Check:
- Package versions
- API compatibility
- Database compatibility
- External services
- Environment variables
- Infrastructure requirements
A small dependency change can sometimes create unexpected problems in production.
Step 3: Run Automated Tests
Automated tests should be an important part of your deployment process.
Depending on your project, your test suite may include:
- Unit tests
- Integration tests
- API tests
- End-to-end tests
- Regression tests
Run your tests before allowing the deployment to continue.
The goal is to catch problems before they reach production.
Step 4: Test in a Staging Environment
Before deploying directly to production, test the release in an environment that closely resembles production.
Verify:
- Application behavior
- Database interactions
- API integrations
- User authentication
- Important workflows
- Configuration
- Performance
Staging gives your team an opportunity to identify problems without affecting real users.
Step 5: Back Up Important Data
A deployment should always have a recovery plan.
Before making important production changes, make sure you have reliable backups of critical data.
Depending on your application, this may include:
- Database backups
- Application files
- Configuration
- Uploaded assets
- Important environment information
Don't assume that a backup exists just because your infrastructure normally creates one.
Verify that the backup is available and usable.
Step 6: Check Database Changes Carefully
Database changes can be one of the most important parts of a deployment.
A poorly planned database migration can cause application errors or make rollback difficult.
When possible, use changes that are compatible with both the old and new application versions during the transition.
For example, instead of immediately removing a database column that the old application still needs, you may first introduce the new structure, deploy the new application, and remove the old structure later.
This approach can make deployments safer.
Step 7: Check Environment Variables and Secrets
Production applications often depend on environment variables and configuration values.
Before deployment, verify:
- Required environment variables exist
- API endpoints are correct
- Database configuration is correct
- Secrets are available
- Production settings are not accidentally replaced with development settings
Never expose sensitive credentials directly in source code.
Step 8: Choose the Right Deployment Strategy
Different applications require different deployment strategies.
Blue-Green Deployment
Two environments are maintained: the current version and the new version. Traffic can then be switched to the new version after it has been tested.
Rolling Deployment
New versions are gradually deployed across servers or instances while other instances continue serving users.
Canary Deployment
The new version is initially released to a small percentage of users or traffic. If everything looks healthy, the deployment can gradually expand.
Feature Flags
New functionality can be deployed while remaining disabled until it is ready to be enabled for users.
The right strategy depends on your infrastructure and application requirements.
Step 9: Keep the Previous Version Available
A safe deployment should have a path back to the previous working version.
Before deploying, make sure you know:
- Which version is currently running
- Which version is being deployed
- How to switch back
- Who can perform the rollback
- How long the rollback should take
A rollback plan should not be created for the first time when something has already gone wrong.
Step 10: Monitor the Deployment
Deployment doesn't end when the new code reaches production.
Monitor the application during and after the release.
Watch:
- Application errors
- Server health
- CPU and memory usage
- Response times
- Database performance
- Logs
- User activity
- Failed requests
Monitoring helps your team identify problems quickly.
Step 11: Set Up Alerts
Developers shouldn't have to manually watch every metric all the time.
Useful alerts can notify your team when important thresholds are exceeded.
Examples include:
- High error rates
- Increased response times
- Server resource problems
- Application crashes
- Failed health checks
- Unusual traffic patterns
Good alerts help your team react before a small issue becomes a major outage.
Step 12: Have a Rollback Plan
Even well-tested deployments can sometimes fail.
Your deployment process should therefore include a clear rollback procedure.
A rollback plan should answer:
- What triggers a rollback?
- Who makes the decision?
- How do we restore the previous version?
- What happens to database changes?
- How do we verify recovery?
Practice the rollback process when possible so your team knows what to do during an actual incident.
Step 13: Communicate With Your Team
Deployment is not only a technical process. Communication matters too.
Before deployment, communicate:
- What is being released
- When the deployment will happen
- Expected impact
- Who is responsible
- What should be monitored
- What the rollback plan is
After deployment, share the result with the team.
Clear communication reduces confusion when something unexpected happens.
Step 14: Review the Deployment
After the deployment is complete, don't immediately forget about it.
Review:
- Did the deployment complete successfully?
- Were there unexpected errors?
- Did performance change?
- Did users experience problems?
- Was the deployment process smooth?
- What could be improved?
Each deployment is an opportunity to improve your development and release process.
Zero-Downtime Deployment Checklist
- Review the changes
- Check dependencies
- Run automated tests
- Test in staging
- Back up important data
- Review database changes
- Check environment variables
- Secure production secrets
- Choose a deployment strategy
- Keep the previous version available
- Monitor the release
- Set up alerts
- Prepare a rollback plan
- Communicate with the team
- Review the deployment afterward
Why Zero-Downtime Deployments Matter
For applications that need to remain available, even short interruptions can affect users and business operations.
A well-planned deployment process helps reduce unnecessary service interruptions while giving development teams a safer way to release new versions.
However, zero downtime should not be treated as a single tool or technology. It is a combination of good architecture, testing, deployment strategy, monitoring, automation, and operational discipline.
Final Thoughts
A reliable deployment process starts long before you press the deploy button.
Prepare → Test → Back Up → Configure → Deploy → Monitor → Roll Back if Needed → Communicate.
Following a consistent checklist can help developers reduce deployment risks and create a more predictable release process.
At C2D (Concept to Deploy), we believe technology should be built with reliability and real-world usability in mind.
What's Next?
After building, optimizing, and maintaining a website or application, it's also important to understand the common mistakes that can reduce its effectiveness.
In our next guide, we'll look at common website mistakes businesses should avoid and how to create a better online experience.
Previous: How to Maintain and Grow Your Business Website
Next: Common Website Mistakes Businesses Should Avoid
Build Reliable Digital Solutions With C2D
At C2D (Concept to Deploy), we believe technology should be designed with reliability, usability, and long-term growth in mind.
From website development and deployment to ongoing improvements, every part of a digital solution should be planned carefully.
Have a concept? C2D can help turn it into a deployable solution.